Overview
BC2SQL is an enterprise-grade data synchronization platform designed to bridge the gap between Microsoft Business Central and SQL databases. Whether you're running Business Central in the cloud (SaaS) or on-premise, BC2SQL provides a robust, reliable way to keep your external databases in sync with your ERP data.
The platform is built on a microservices architecture, consisting of two main components that work together seamlessly. The bc2sql-core is the synchronization engine that handles all the heavy lifting: connecting to Business Central APIs, fetching data, applying transformations, and writing to your target databases. The bc2sql-web provides an intuitive web interface where you can configure everything, monitor sync operations, and troubleshoot issues.
Key Capabilities
At its heart, BC2SQL is designed to make data synchronization simple yet powerful. The platform supports multi-tenant architecture, meaning you can manage multiple companies within a single installation. Each company can have its own Business Central connections, target databases, and synchronization rules, all completely isolated from one another.
When it comes to databases, BC2SQL speaks multiple languages. You can synchronize your Business Central data to SQL Server, MySQL, PostgreSQL, or SQLite databases. This flexibility means you can integrate BC2SQL into virtually any existing infrastructure without having to change your database platform.
The synchronization engine supports two modes of operation. Full sync fetches all records from Business Central, which is useful for initial data loads or when you need to ensure complete data consistency. Incremental sync is smarter: it only fetches records that have changed since the last synchronization, dramatically reducing API calls and processing time for regular operations.
Data Transformation
Raw data from Business Central often needs to be transformed before it's useful in your target database. BC2SQL includes over 80 transformation functions that let you manipulate strings, convert data types, perform calculations, handle null values, and much more. You can chain multiple transformations together, and the system executes them in a defined priority order.
How It Works
The synchronization flow is straightforward. BC2SQL connects to Business Central using either OAuth2 (recommended for SaaS) or Basic Authentication (for on-premise). It fetches data through the OData API, paginating through large datasets automatically. Each record passes through any transformation rules you've defined, then gets upserted into your target database. The system handles primary key detection, insert-vs-update logic, and transaction management automatically.
You can run synchronizations manually, on a schedule using CRON expressions, or trigger them programmatically through the API. All operations are logged with complete audit trails, so you always know exactly what happened and when.
Architecture
Supported Databases
- SQL Server
- MySQL / MariaDB
- PostgreSQL
- SQLite
Creating Your Account
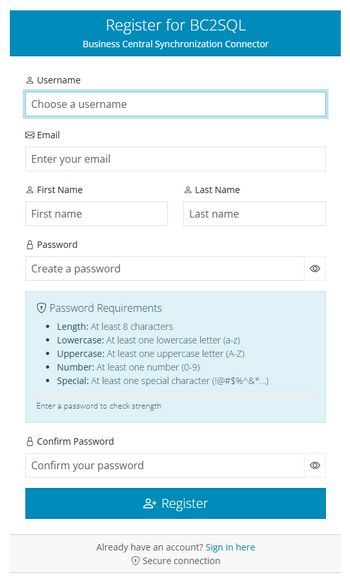
Getting started with BC2SQL begins with creating your user account. Navigate to the registration page and fill in your details: choose a unique username that you'll use to log in, provide a valid email address for account recovery and notifications, and set a secure password.
Security is important, so BC2SQL enforces strong password requirements. Your password must be at least 8 characters long and include a mix of uppercase letters, lowercase letters, numbers, and special characters. This might seem strict, but it protects your synchronization configurations and, by extension, access to your business data.
When you complete registration, two things happen automatically. First, the system creates a default company for you, so you can start configuring your first synchronization immediately. Second, a verification email is sent to your address. Clicking the link in that email confirms your account and unlocks all platform features.
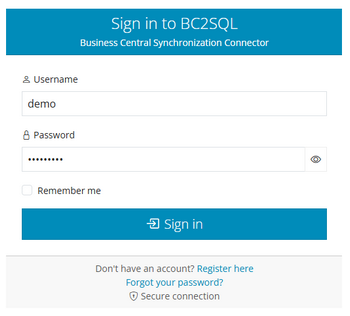
Logging In
Once registered, you can access BC2SQL through the login page. Enter your username and password, and you'll be taken to your dashboard. If you're on a trusted device, you can enable the "Remember me" option, which extends your session to 30 days instead of the default 24 hours.
Social Login Options
For convenience, BC2SQL supports social login through Microsoft and Google accounts. This is particularly useful if your organization already uses Microsoft 365 or Google Workspace, as it provides single sign-on convenience and eliminates the need to remember another password.
When you choose social login, you'll be redirected to Microsoft or Google to authenticate. After confirming your identity with the provider, you're automatically logged into BC2SQL. If it's your first time, the system creates your account using the information from your social profile and sets up your default company, just like with traditional registration.
Password Recovery
If you forget your password, don't worry. Click "Forgot Password" on the login page and enter your registered email address. You'll receive an email with a secure, time-limited link to reset your password. For security reasons, the link expires after a set period, so use it promptly.
Registration page
Login page
Password Requirements
- Minimum 8 characters
- At least one uppercase letter
- At least one lowercase letter
- At least one number
- At least one special character
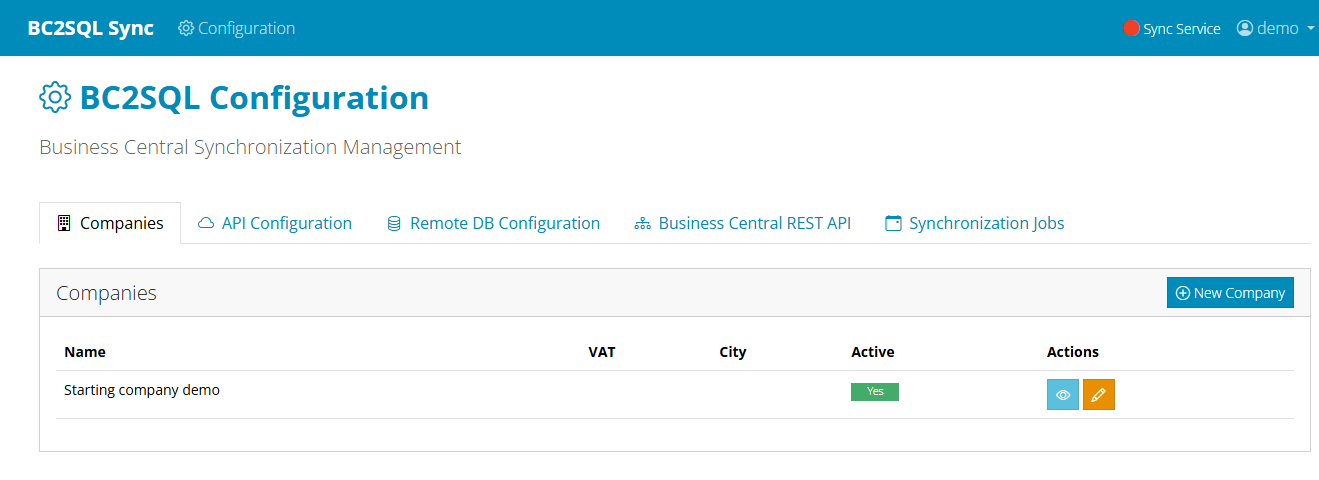
Understanding Companies
In BC2SQL, a "Company" represents a distinct business entity or organizational unit. This multi-tenant design is one of the platform's most powerful features, allowing you to manage data synchronization for multiple businesses, divisions, or environments from a single installation.
Each company operates in complete isolation. It has its own Business Central API connections, its own target databases, its own entity mappings, and its own synchronization schedules. This means you can safely manage production and development environments side by side, or handle data for multiple clients if you're a service provider.
Creating a New Company
To create a company, navigate to the Companies section and click "New Company." You'll see a form where you can enter all relevant business information. The only required field is the company name, but we recommend filling in as much detail as practical for your records.
You can enter the company's VAT number and fiscal code for tax and legal identification. The address fields let you record the company's legal address, including street, postal code, city, and province. Contact information includes phone numbers, mobile numbers, email addresses, and website URLs.
For organizations where different people handle technical matters, there are separate fields for a contact person along with their direct phone and email. Finally, the notes field provides space for any additional information you want to track.
Managing Companies
The company list shows all companies associated with your account. From here, you can view details, edit information, or manage the company's active status. Deactivating a company is useful when you want to temporarily pause all synchronizations without deleting your configuration. All scheduled jobs for inactive companies are automatically suspended.
When you delete a company, be aware that this also removes all associated configurations: BC API connections, database connections, entity mappings, and sync job histories. This action cannot be undone, so use it carefully.
Best Practices
We recommend creating separate companies for production and development/testing environments, even if they represent the same business entity. This prevents accidental synchronization to production databases during testing and keeps your configurations organized. Use clear, descriptive names that make it obvious which environment each company represents.
Company management interface
Use Cases
- Multiple Businesses: Manage sync for different legal entities
- Environments: Separate production from dev/test
- Client Management: Service providers can manage multiple clients
- Regional Operations: Different regions with different BC instances
Before You Begin
Before configuring a Business Central endpoint in BC2SQL, you'll need to gather some information and potentially set up authentication credentials. The exact requirements depend on whether you're connecting to Business Central Online (SaaS) or an on-premise installation.
For Business Central Online, you'll need OAuth2 credentials from Azure Active Directory. This involves creating an App Registration in the Azure Portal, which gives you a Client ID and Client Secret. You'll also need to grant the application appropriate API permissions for Dynamics 365 Business Central.
For on-premise installations, you can use either OAuth2 (if your organization has set it up) or traditional Basic Authentication with a username and password.
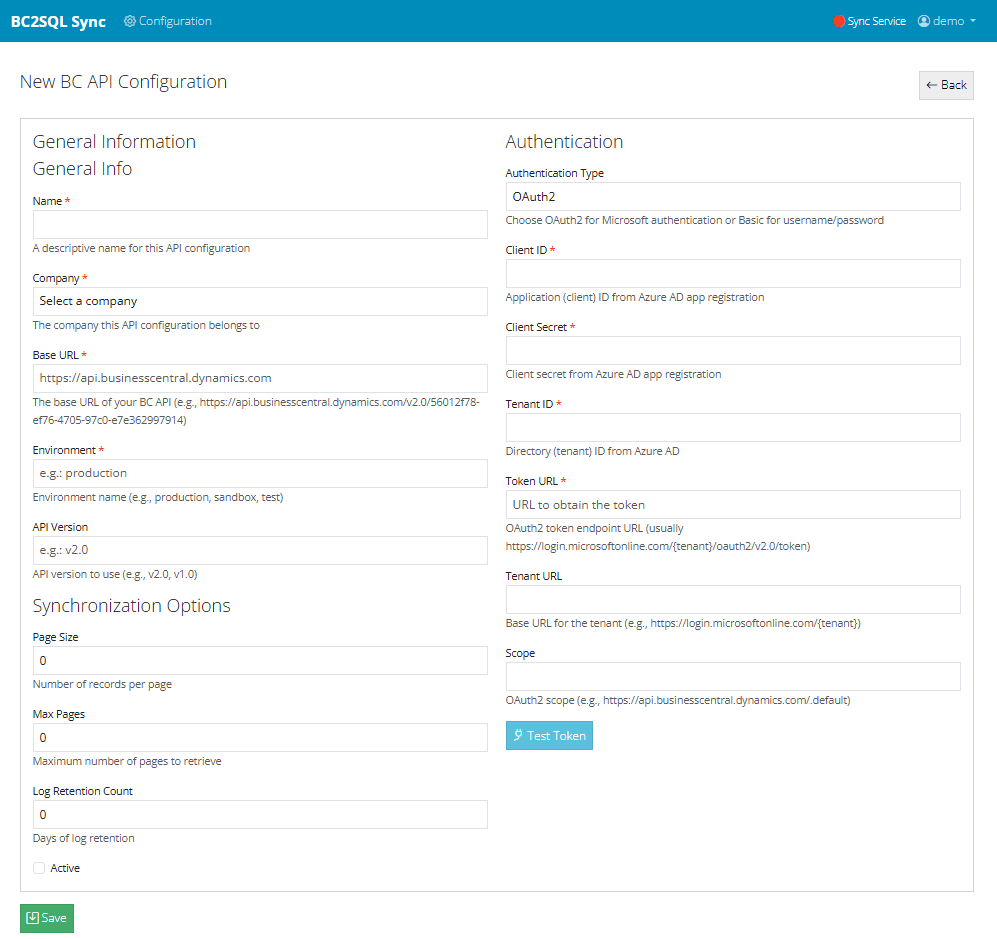
Creating a BC API Configuration
Navigate to the BC API Configurations section and click to create a new configuration. First, select which company this configuration belongs to, then give it a descriptive name like "BC Production" or "BC Sandbox."
Set the environment type (production or sandbox) and indicate whether this is a SaaS instance. This helps BC2SQL apply the right URL patterns and authentication flows.
The Base URL is the foundation of all API calls. For Business Central Online, this typically follows the pattern: https://api.businesscentral.dynamics.com/v2.0/{tenant-id}/{environment}/api/v2.0. For on-premise, it would be something like: https://your-server:7048/BC/api/v2.0.
OAuth2 Authentication (Recommended)
For OAuth2, you'll provide the Tenant ID (your Azure AD tenant), Client ID (from your App Registration), and Client Secret. The Token URL is where BC2SQL requests access tokens, typically https://login.microsoftonline.com/{tenant-id}/oauth2/v2.0/token.
The Scope field usually contains https://api.businesscentral.dynamics.com/.default, which requests all permissions granted to your application. BC2SQL handles token acquisition and automatic refresh, so you don't need to worry about token expiration.
Basic Authentication
If you're using Basic Authentication, simply provide a username and password. BC2SQL encodes these credentials and includes them in each API request. This method is simpler to set up but less secure than OAuth2, so use it only for on-premise installations where OAuth2 isn't available.
Pagination Settings
Business Central APIs return data in pages. The Page Size setting controls how many records BC2SQL requests at a time; the default of 100 works well for most scenarios. Max Pages limits the total number of pages fetched, which can be useful during testing or when you only need a sample of data. Set it to 0 for unlimited.
BC API configuration form
Azure AD Setup
- Go to Azure Portal
- Navigate to Azure Active Directory
- Create new App Registration
- Note the Client ID and Tenant ID
- Create a Client Secret
- Add API Permission: Dynamics 365 BC
- Grant admin consent
Test Connection
After saving your configuration, use the "Test Connection" button to verify that BC2SQL can authenticate and reach the API successfully.
Supported Database Platforms
BC2SQL can synchronize data to several popular database platforms. SQL Server is fully supported, including Azure SQL Database for cloud deployments. MySQL and MariaDB are supported for organizations that prefer open-source solutions. PostgreSQL offers another robust open-source option with advanced features. SQLite is available for lightweight deployments, testing, or embedded scenarios.
Each database type has its own connection requirements and slightly different SQL dialects, but BC2SQL handles these differences automatically. You just need to provide the connection details, and the platform takes care of generating the appropriate queries.
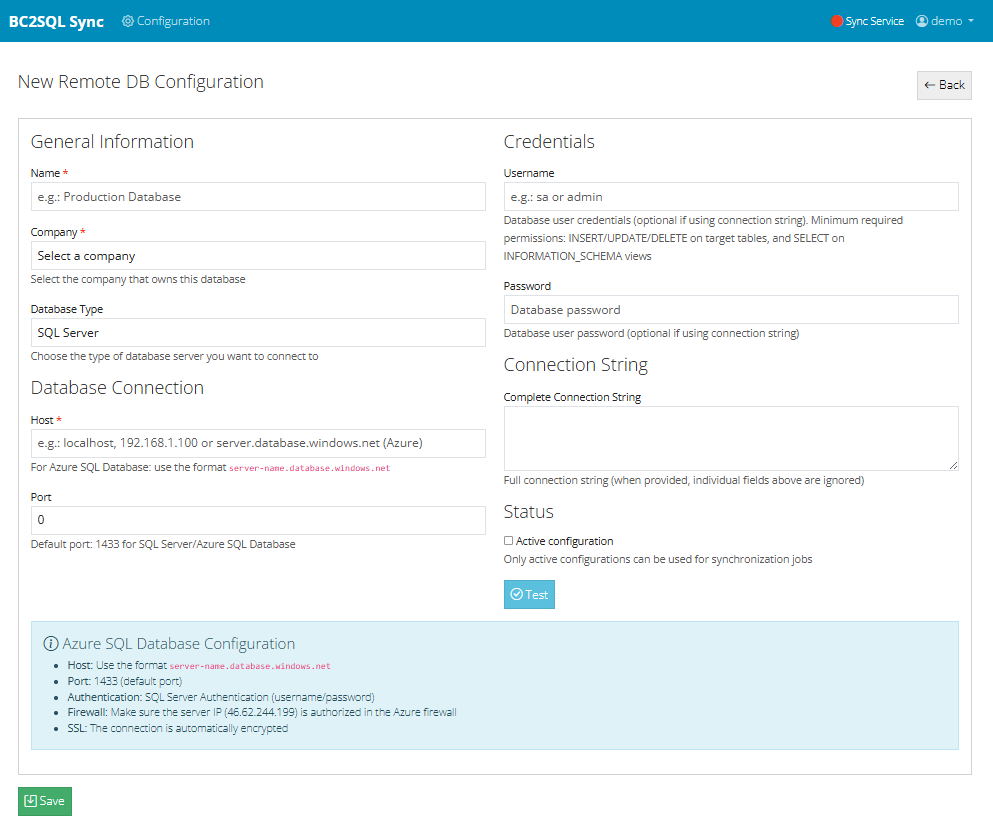
Creating a Database Configuration
To set up a target database, navigate to the Remote Database section and create a new configuration. Start by selecting the company this database belongs to and giving it a meaningful name, such as "Data Warehouse Production" or "Reporting Database."
Select the database type from the dropdown, then provide connection details. For network-accessible databases, you'll enter the host (server name or IP address) and port number. The default ports are 1433 for SQL Server, 3306 for MySQL, and 5432 for PostgreSQL. For SQLite, you'll specify a file path instead.
Enter the username and password for database authentication. BC2SQL stores passwords securely using encryption. If you prefer, you can provide a complete connection string instead of individual parameters, which is useful for advanced configurations or when you need to include additional connection options.
Database Permissions
The database user you configure needs appropriate permissions to perform synchronization operations. At minimum, the user needs SELECT, INSERT, and UPDATE permissions on the target tables. If you want BC2SQL to automatically create tables based on Business Central metadata, you'll also need CREATE TABLE permission.
We recommend creating a dedicated database user for BC2SQL rather than using a general-purpose or administrative account. This follows the principle of least privilege and makes it easier to audit synchronization activity.
Security Considerations
Whenever possible, use encrypted connections to your database. For SQL Server, this means enabling SSL/TLS. For MySQL and PostgreSQL, similar encryption options are available. Avoid sending credentials over unencrypted connections, especially if the database is accessed over the internet.
Consider network security as well. If your database server has firewall rules, make sure the BC2SQL server's IP address is allowed. For cloud databases like Azure SQL, you may need to configure virtual network rules or firewall exceptions.
Database configuration form
Default Ports
- SQL Server: 1433
- MySQL: 3306
- PostgreSQL: 5432
- SQLite: File-based (no port)
Security Tips
- Use a dedicated sync user
- Grant minimal required permissions
- Enable SSL/TLS encryption
- Configure firewall rules
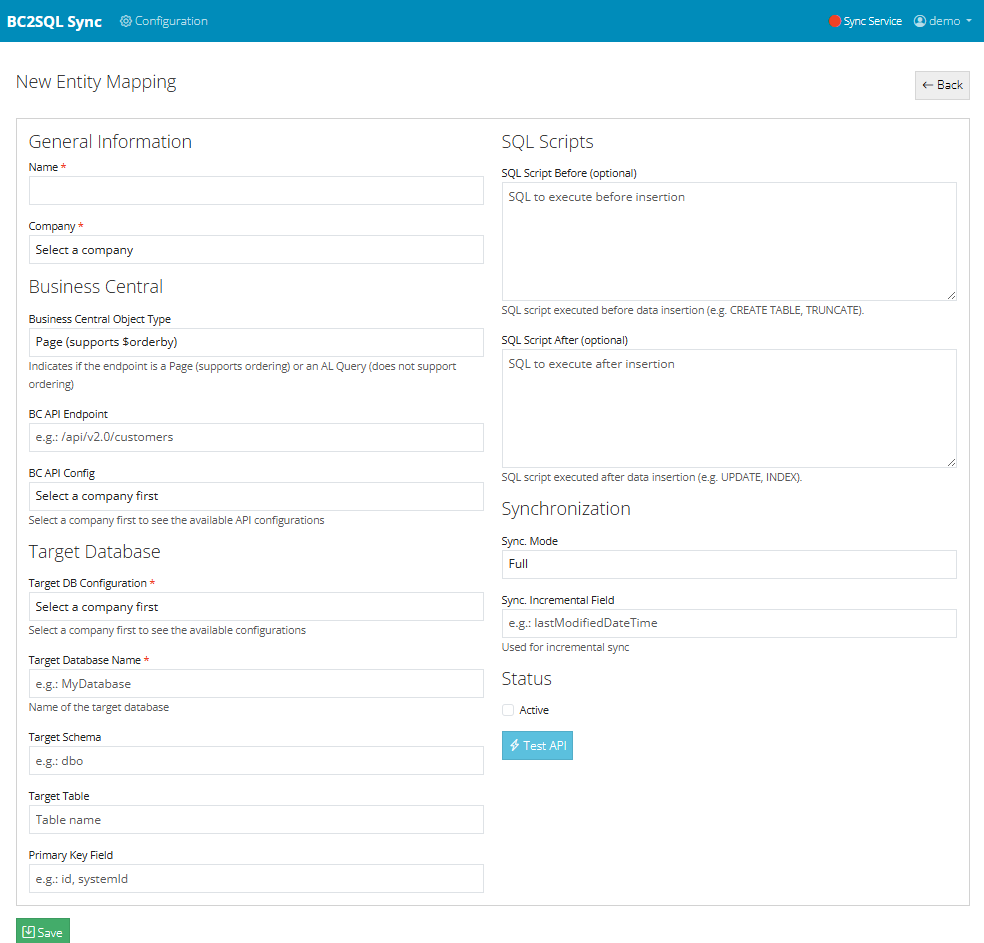
Entity Mapping: The Foundation
Before mapping individual fields, you need to create an Entity Mapping that defines the relationship between a Business Central entity and a target database table. Think of it as drawing a line from a BC data source (like "customers" or "items") to a specific table in your database.
When creating an entity mapping, you select which BC API configuration provides the data and which database configuration receives it. You specify the BC API endpoint (the entity name in the OData URL) and the target table name, including its schema and database if applicable.
Two critical settings determine how synchronization behaves. The primary key field identifies which BC field uniquely identifies each record; this is usually "systemId" or the entity's natural key. The sync mode can be "full" (sync all records every time) or "incremental" (only sync changes since the last run). For incremental sync, you also specify the timestamp field, typically "systemModifiedAt."
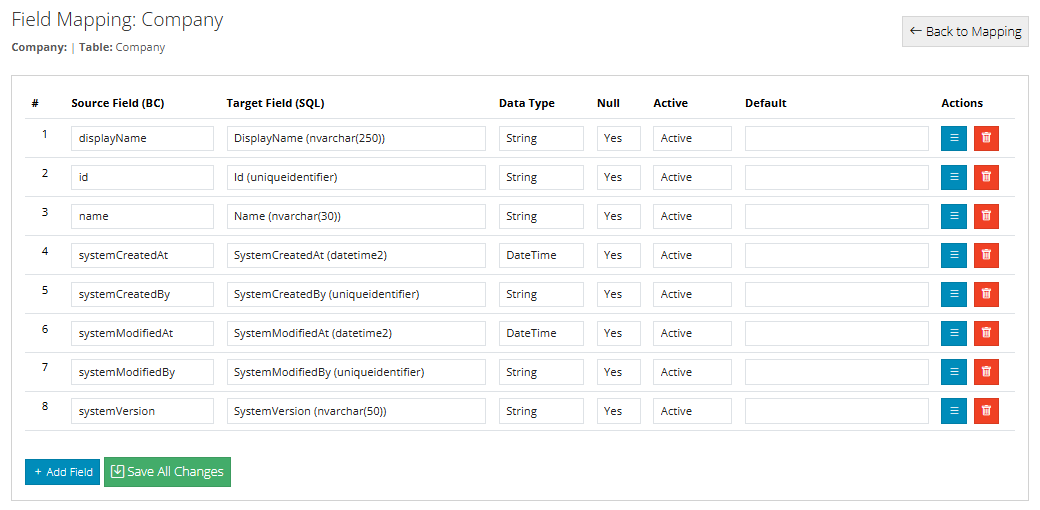
Field-Level Mapping
Once your entity mapping exists, you can define field mappings that specify exactly how data flows from BC fields to database columns. The field mapping interface shows BC source fields on one side and target table columns on the other, letting you draw connections between them.
For each mapping, you specify the source field name (as it appears in the BC JSON response), the target column name, and the data type. Supported types include VARCHAR for text, NUMBER for decimals, INT for integers, BOOL for boolean values, DATE for dates without time, and DATETIME for timestamps.
You can mark fields as nullable or not, and provide default values that are used when the source field is null or missing. The active flag lets you temporarily disable individual field mappings without deleting them.
Manual vs. Automatic Mapping
You can create field mappings manually, one at a time, giving you complete control over every detail. This is useful when field names differ significantly between source and target, or when you need precise control over data types and defaults.
Alternatively, BC2SQL can suggest mappings automatically. The suggestion engine analyzes BC source fields and target table columns, using name similarity algorithms to propose likely matches. It's smart enough to handle common variations like underscores, camelCase, and different abbreviations. Review the suggestions carefully, accept the ones that look correct, and adjust any that need tweaking.
Important Fields to Include
Always map the primary key field you specified in the entity mapping. Without it, BC2SQL can't determine whether to insert new records or update existing ones. For incremental synchronization, also map the timestamp field so the system can track what's changed.
You don't have to map every field from Business Central. Map only the fields you actually need in your target database. This reduces data transfer, simplifies your target schema, and can improve performance.
Entity mapping configuration
Field mapping interface
Supported Data Types
- VARCHAR: Text strings
- NUMBER: Decimal numbers
- INT: Integer numbers
- BOOL: True/False values
- DATE: Date only
- DATETIME: Date and time
Why Transform Data?
Data coming from Business Central often needs adjustment before it's suitable for your target database or downstream applications. Field names might not match, data formats might differ, enum values might need translation, or you might need to calculate derived values. BC2SQL's transformation system lets you handle all of these scenarios without writing custom code.
Transformations are defined as rules attached to entity mappings. Each rule specifies a source field, a target column, and a transformation function with its parameters. You can apply multiple transformations to the same field, and they execute in priority order, with lower priority numbers running first.
String Transformations
String functions are among the most commonly used. STRING_TRIM removes leading and trailing whitespace, which is essential when BC data includes padding. STRING_UPPER and STRING_LOWER standardize case, while STRING_CAPITALIZE formats names properly with the first letter uppercase.
STRING_TRUNCATE ensures text doesn't exceed your column's maximum length, preventing database errors. STRING_REPLACE performs find-and-replace operations, useful for correcting common data entry errors or standardizing abbreviations. STRING_NORMALIZE_ENUM is particularly useful for BC data, as it converts the encoded format BC uses for enum values (like "_x0020_" for spaces) back to readable text.
STRING_MAP_VALUE lets you create a lookup table that transforms codes into full descriptions or vice versa. For example, you could map "A" to "Active", "I" to "Inactive", and so on. This is invaluable when your target system uses different codes than Business Central.
Numeric Transformations
Numbers often need formatting adjustments. NUMBER_ROUND controls decimal precision, NUMBER_SCALE multiplies values by a factor (useful for unit conversions), and NUMBER_CLAMP ensures values stay within acceptable ranges. NUMBER_PARSE handles numeric strings with non-standard decimal separators.
Date and Time Transformations
Date handling is often tricky when moving data between systems. DATE_PARSE interprets date strings in various formats, while DATE_FORMAT outputs dates in your required format. DATE_ADD_DAYS, DATE_ADD_MONTHS, and DATE_ADD_YEARS let you adjust dates, which is useful for calculating due dates or projections.
For timestamps, DATETIME_NORMALIZE_TIMEZONE converts between time zones, ensuring consistent time representation regardless of where data originated. DATETIME_TRUNCATE_MINUTE and DATETIME_TRUNCATE_SECOND remove precision you don't need.
Boolean and Utility Functions
Boolean transformations help when source and target systems represent true/false differently. BOOL_PARSE_STRING interprets various text representations ("Yes", "No", "Y", "N", "1", "0", etc.) as boolean values. BOOL_TO_STRING does the reverse, letting you specify exactly what text represents true and false.
Utility functions round out the collection. NULL_IF_EMPTY converts empty strings to NULL, which is often preferable in databases. COALESCE provides a default value when the source is null or empty, ensuring your target always has meaningful data.
Chaining Transformations
You can apply multiple transformations to the same field by creating multiple rules with different priorities. For example, to clean up a name field, you might first apply STRING_TRIM (priority 1), then STRING_UPPER (priority 2), then STRING_TRUNCATE (priority 3). Each transformation receives the output of the previous one, giving you powerful data manipulation capabilities.
String Functions
- TRIM, UPPER, LOWER, CAPITALIZE
- TRUNCATE, PAD_LEFT, PAD_RIGHT
- REPLACE, REGEX_MATCH, REGEX_REPLACE
- NORMALIZE_ENUM, MAP_VALUE
- CONCAT, EXTRACT_PREFIX, EXTRACT_SUFFIX
Numeric Functions
- PARSE, SCALE, ROUND
- CLAMP, ABS, NEGATE
- MAP_RANGE, DEFAULT_IF_NULL
- INT_CAST_FROM_DECIMAL
- INT_MAP_ENUM
Date/Time Functions
- PARSE, FORMAT, TRUNCATE_DAY
- ADD_DAYS, ADD_MONTHS, ADD_YEARS
- EXTRACT_YEAR, EXTRACT_MONTH, EXTRACT_DAY
- NORMALIZE_TIMEZONE
- SPLIT_DATE, SPLIT_TIME
Automating Your Data Synchronization
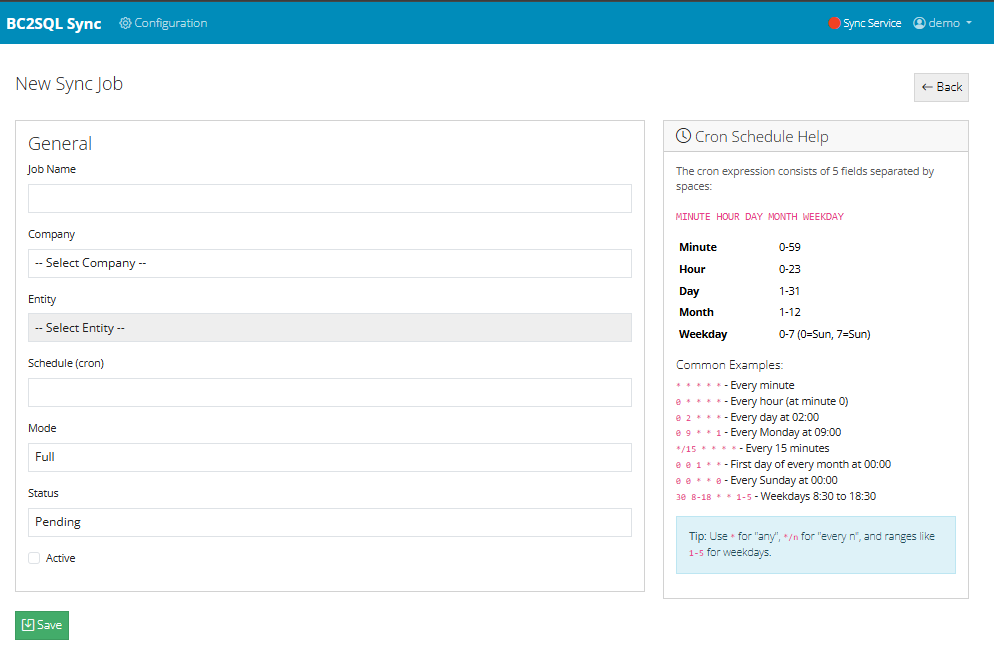
While manual synchronization is useful for testing and one-off data loads, most production scenarios require automated, scheduled synchronization. BC2SQL includes a powerful scheduling system that lets you define when and how often each entity should sync, using the industry-standard CRON syntax that system administrators and developers are already familiar with.
Scheduled sync jobs run automatically in the background without any manual intervention. You can set up different schedules for different entities based on how frequently their data changes and how critical it is to have up-to-date information in your target database. Some entities might need near-real-time updates every few minutes, while others might only need a daily refresh.
Full Sync vs. Incremental Sync
When creating a sync job, you choose between two synchronization modes, each suited for different scenarios.
Full Sync retrieves every record from the Business Central entity and writes it to your target database. This mode is comprehensive but resource-intensive. It's ideal for initial data loads when you're populating a new table, periodic complete refreshes to ensure absolute data consistency, entities that don't have reliable timestamp fields, and recovery scenarios after data issues or system problems. Full sync guarantees that your target database exactly mirrors the source, but it consumes more API calls and takes longer to complete, especially for large entities.
Incremental Sync is smarter and more efficient. It queries your target database for the maximum timestamp value (typically from the systemModifiedAt field), then fetches only records from Business Central that have been modified since that timestamp. This dramatically reduces the amount of data transferred and processed. Incremental sync is the recommended mode for regular scheduled jobs because it minimizes API usage and completes quickly, makes efficient use of network bandwidth, reduces load on both BC and your target database, and scales well even for entities with millions of records. The only requirement is that your entity must have a reliable timestamp field that BC updates whenever a record changes. Most standard BC entities include systemModifiedAt for this purpose.
Understanding CRON Syntax
BC2SQL uses CRON expressions to define sync schedules. CRON is a time-based job scheduling syntax originally from Unix systems, now universally used across platforms. A CRON expression consists of five fields that specify when a job should run.
The five fields, from left to right, are: minute (0-59), hour (0-23), day of month (1-31), month (1-12), and day of week (0-6, where 0 is Sunday). Each field can contain a specific value, an asterisk (*) meaning "every," a range (like 1-5), a list (like 1,3,5), or a step value (like */15 meaning "every 15").
For example, the expression 0 * * * * means "at minute 0 of every hour" (hourly on the hour). The expression */15 * * * * means "every 15 minutes." And 0 2 * * * means "at 2:00 AM every day."
Creating a Sync Job
To create a scheduled sync job, navigate to the Sync Jobs section and click to create a new job. Select the entity mapping you want to synchronize, choose the sync mode (full or incremental), and enter your CRON expression. Give the job a descriptive name so you can easily identify it in logs and monitoring.
You can also enable or disable jobs without deleting them. This is useful for temporarily pausing synchronization during maintenance windows or when troubleshooting issues. The job configuration remains intact, ready to be re-enabled when needed.
Monitoring and Logs
Every scheduled sync execution is logged with detailed information: start time, end time, records processed, records failed, and any error messages. You can review these logs to verify that your jobs are running as expected and to diagnose any issues that arise. The system also tracks the next scheduled run time for each job, so you always know when the next sync will occur.
CRON Syntax
│ ┌───── hour (0-23)
│ │ ┌───── day of month (1-31)
│ │ │ ┌───── month (1-12)
│ │ │ │ ┌───── day of week (0-6)
│ │ │ │ │
* * * * *
Sunday = 0, Monday = 1, ... Saturday = 6
Common Schedules
*/5 * * * *
Every 5 minutes*/15 * * * *
Every 15 minutes0 * * * *
Every hour (on the hour)0 */4 * * *
Every 4 hours0 2 * * *
Daily at 2:00 AM0 3 * * 0
Weekly on Sunday at 3 AM0 1 1 * *
Monthly on the 1st at 1 AM0 6 * * 1-5
Weekdays at 6:00 AM
Incremental Sync
Best for regular updates
- Only fetches changed records
- Fast and efficient
- Minimal API usage
Full Sync
Best for complete refresh
- Fetches all records
- Ensures complete consistency
- Use for initial loads
Sync job configuration
BC2SQL includes several utilities designed to make configuration easier and help you troubleshoot issues. These tools can save significant time during initial setup and ongoing maintenance.
Test BC Authentication
Before you start synchronizing data, it's wise to verify that BC2SQL can successfully connect to Business Central. The Test Connection feature attempts to authenticate using your configured credentials and makes a simple API call to confirm everything works.
If the test fails, you'll receive a detailed error message indicating what went wrong. Common issues include incorrect Client ID or Secret, expired credentials, insufficient API permissions, or network connectivity problems. The error messages are designed to point you toward the solution.
Test Database Connection
Similarly, you can test your database connection before attempting any synchronization. This utility verifies that BC2SQL can reach your database server, authenticate with the provided credentials, and execute basic queries.
Connection failures typically stem from incorrect host names or IP addresses, wrong port numbers, firewall rules blocking access, or authentication failures. The test helps you isolate and resolve these issues before they affect your synchronization jobs.
View Database Tables
When setting up entity mappings, you need to know what tables exist in your target database and what columns they contain. The View Tables utility connects to your database and retrieves this metadata, displaying tables organized by schema.
For each table, you can see all columns along with their data types, maximum lengths for string columns, whether they allow null values, and which columns form the primary key. This information is invaluable when configuring field mappings and ensuring data type compatibility.
Suggest CREATE TABLE
If your target table doesn't exist yet, BC2SQL can generate the CREATE TABLE statement for you. This utility examines the Business Central entity's metadata, including field names, data types, and constraints, then produces SQL DDL appropriate for your target database platform.
The generated script includes appropriate data type mappings (BC's Edm types to SQL types), primary key definitions, and nullable settings. You can copy the script, review it, make any necessary adjustments, and execute it against your database. This can save considerable time compared to manually crafting table definitions.
Suggest Field Mapping
Manually mapping dozens of fields can be tedious and error-prone. The field mapping suggestion tool automates this process by analyzing both the BC entity structure and your target table schema, then proposing mappings based on name similarity.
The algorithm uses fuzzy matching to handle variations in naming conventions. It recognizes that "customerNo" probably maps to "customer_no" or "CustomerNumber." Each suggestion comes with a confidence score, so you can quickly identify which mappings are certain and which might need manual review. Accept the suggestions that look correct, adjust the questionable ones, and you're done in a fraction of the time.
Test Transformation
Before applying a transformation rule to your actual synchronization, you can test it with sample data. Enter a test value, and the system shows you exactly what output the transformation produces. This lets you verify that your parameters are correct and the transformation behaves as expected.
Testing is especially valuable for complex transformations like regex patterns or value mappings where a small mistake in configuration could produce unexpected results. Test with various inputs, including edge cases and null values, to ensure your transformation handles all scenarios correctly.
View BC Metadata
Business Central's OData API exposes metadata about each entity, describing available fields, their data types, constraints, and relationships. The View Metadata utility retrieves and displays this information in a readable format.
This is your reference for understanding exactly what data Business Central makes available. You can see all properties with their OData types (Edm.String, Edm.Decimal, etc.), maximum lengths for string fields, precision for decimals, and which fields serve as keys. Navigation properties show relationships to other entities. Use this information to plan your field mappings and understand the data you're working with.
Execute SQL Scripts
Entity mappings can include SQL scripts that run before or after synchronization. The Execute Script utility lets you test these scripts manually before incorporating them into your sync workflow.
Pre-sync scripts might disable triggers, create temporary tables, or prepare the target database in some way. Post-sync scripts might re-enable triggers, refresh materialized views, or call stored procedures for additional processing. Testing these scripts ensures they work correctly and don't cause errors during actual synchronization runs.